
Does "travel diaper changing tips" really make traveling with a baby easier?
Answer: Yes — travel diaper changing tips cut stress and speed up diaper changes by teaching simple habits (pack smart, use a travel diaper mat, and pick the best travel diaper changing pad). These tips reduce mess, limit exposure to germs, and help parents stay calm and in control whether at airports, rest stops, or tiny airplane bathrooms.
⏱ 18 min readTravel Diaper Changing Tips That Make Every Trip Easier
Traveling with a baby can feel chaotic — the mess, the lack of flat clean surfaces, and the constant “Where’s the wipes?” panic. This guide breaks down practical travel diaper changing tips, explains why a travel diaper mat and the best travel diaper changing pad matter, and shows how the right gear — like the 3-in-1 baby diaper pad — makes diapering on the go faster, cleaner, and less stressful for new parents.
travel diaper mat & best travel diaper changing pad — 💡 See it in action
Explore helpful ideas and gear to make travel more joyful for you and your little one.
Why these travel diaper changing tips work — Reduce mess, save time, protect baby
When you travel, routine collapses: surfaces are unknown, restrooms are crowded, and stress is high. The best travel diaper changing tips work because they solve three core problems:
- Speed: A predictable routine and the right setup cut change time by half.
- Hygiene: A travel diaper mat creates a clean barrier on any surface.
- Calm: Clear systems and backups reduce parental panic and soothe baby faster.
Do these tips actually save time?
Yes. Using the travel diaper mat and a structured supply layout reduces average change time from 5–8 minutes to 2–3 minutes in unfamiliar places, keeping your baby calmer and reducing blowout spread. These travel diaper changing tips focus on prep, containment, and one-handed techniques.
Quick essentials packing list — Pack once, change anywhere
Carry a compact kit you can reach in under 10 seconds. Think of it as a "mobile changing station" that goes from stroller to plane seat to car quickly.
- Travel diaper mat (waterproof, foldable)
- Best travel diaper changing pad (lightweight, wipes pocket)
- Diapers — pack 1.5x expected use
- Travel-sized wipes + extra full pack
- Disposable changing pads or liners
- Zip bags for dirty diapers or clothes
- Hand sanitizer and small bottle of baby-safe disinfectant
- Spare outfit and plastic bag for soiled clothes
- Small toy or pacifier to distract
Pack like this: single tote system
Use one soft tote or organizer pouch with clear pockets — diapers in the front, wipes in the middle, change pad folded at the back. When you open the tote, everything should be visible and reachable without digging.
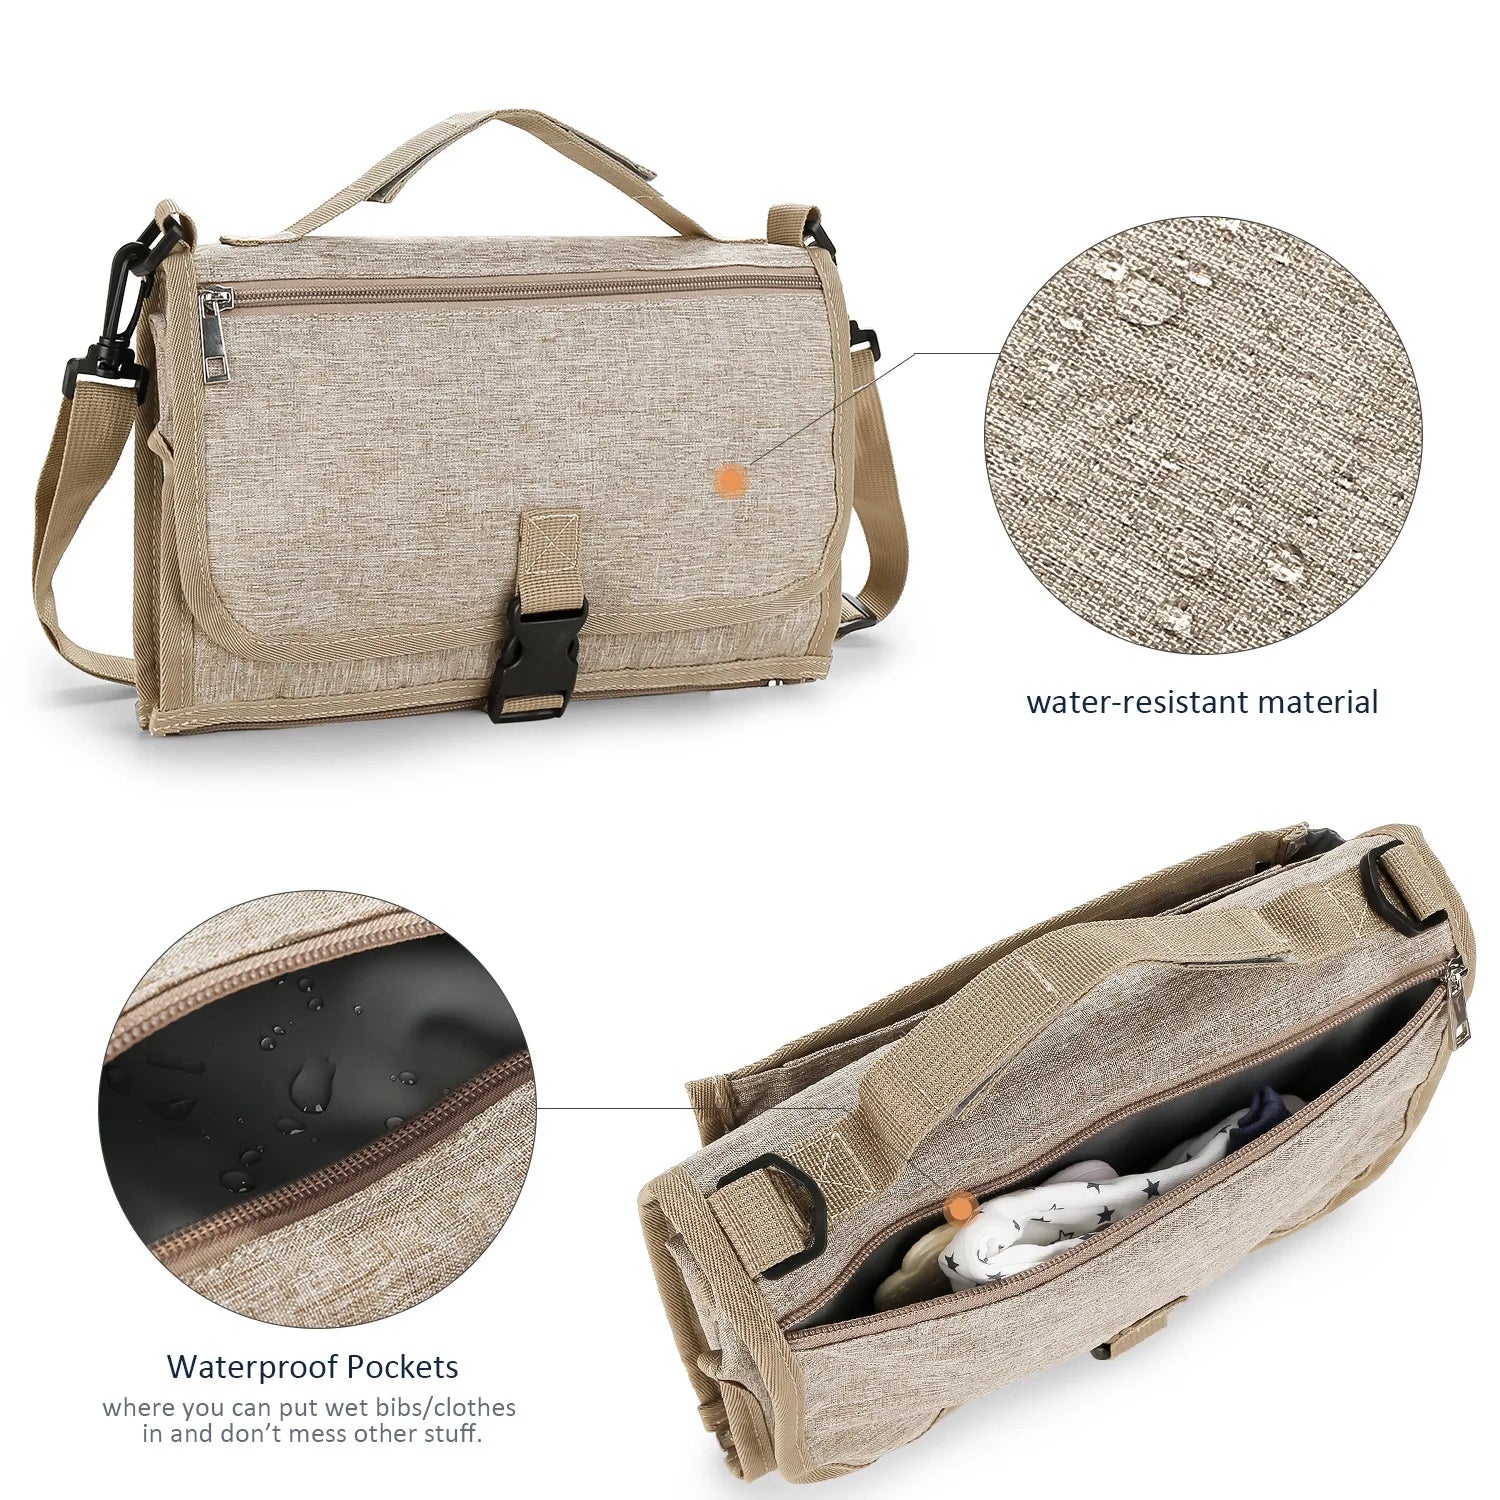
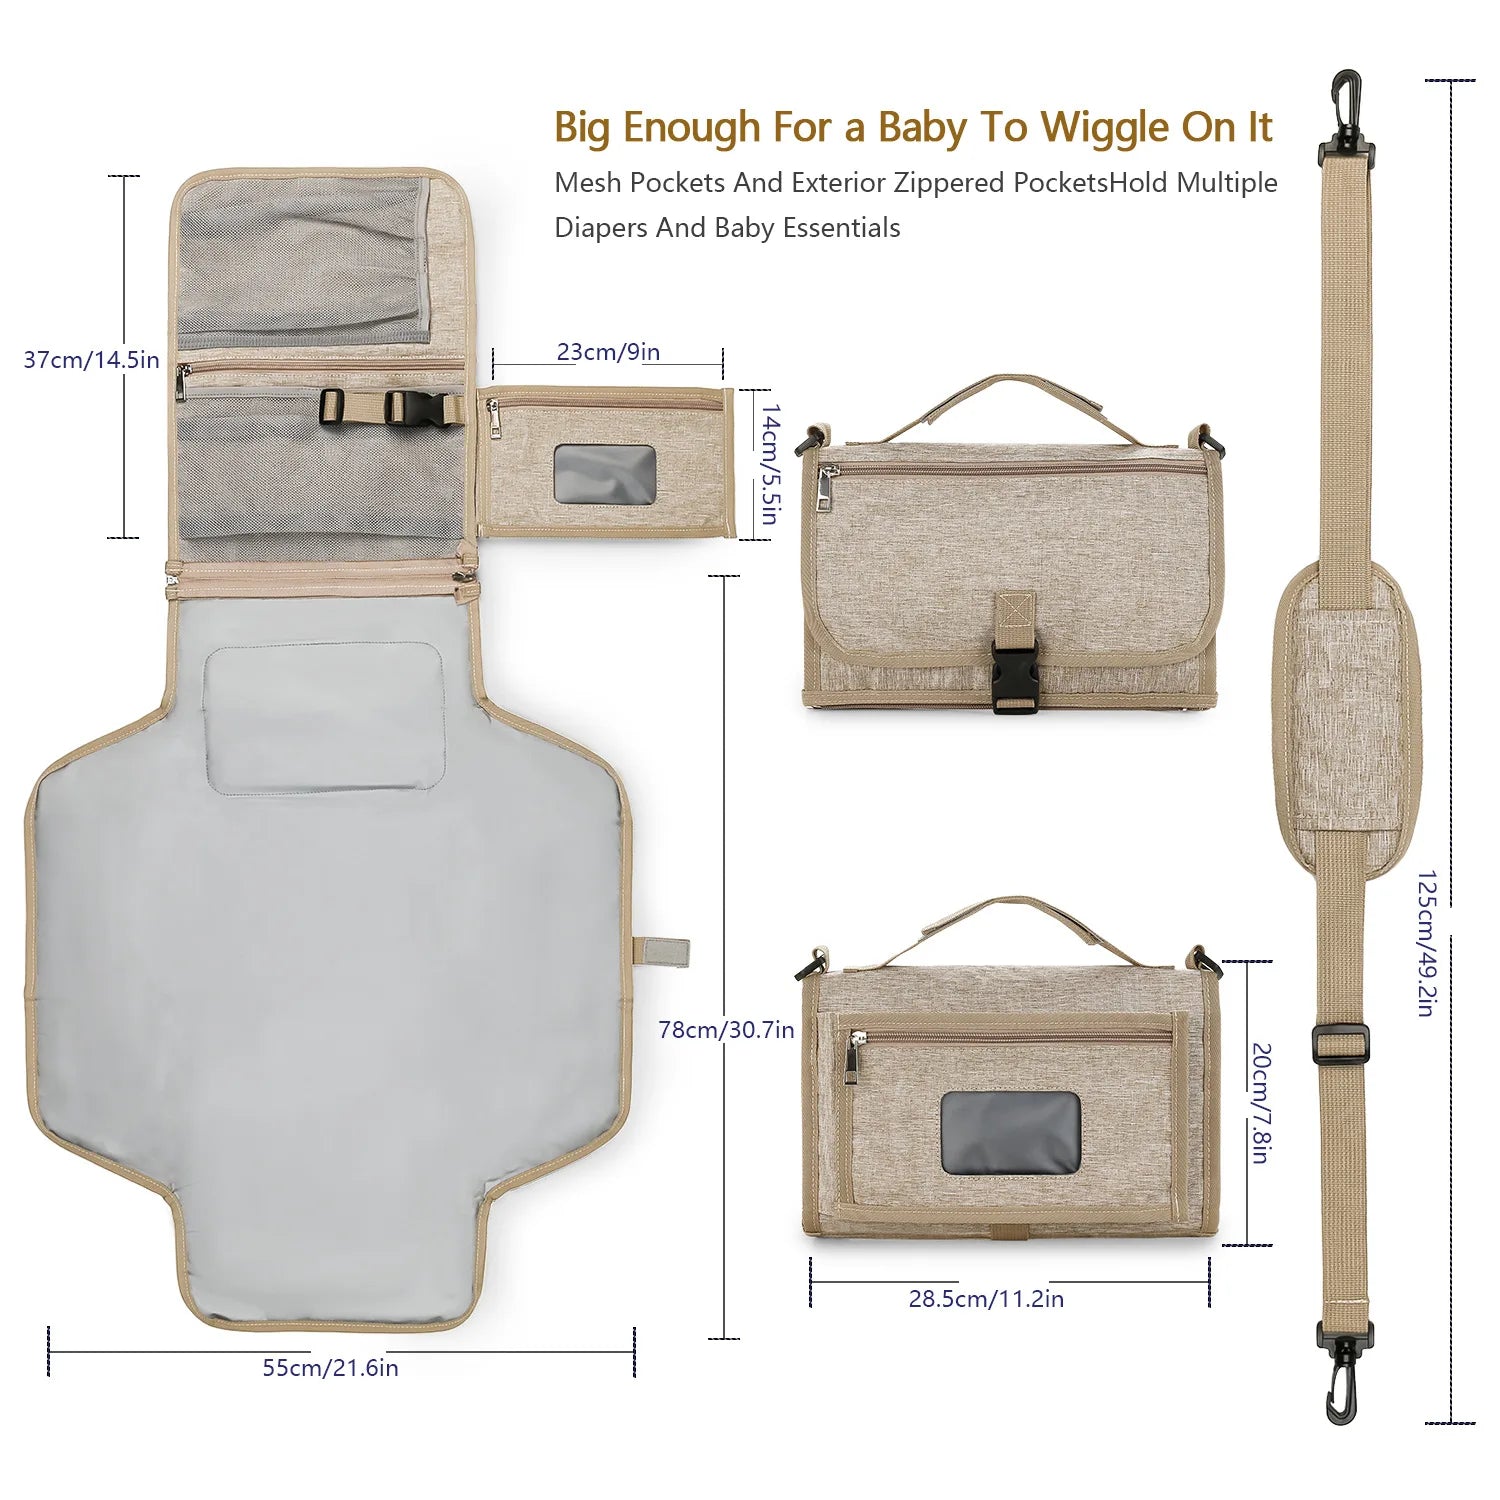
How choosing the right pad saves time and headaches
travel diaper changing tips often start and end with selecting a pad that matches your travel style. Consider weight, footprint when folded, pocket features, and ease of cleaning.
Direct answer: The best travel diaper changing pad is compact, leak-proof, and includes pockets for wipes and diapers — it prevents mess, streamlines one-handed changes, and often doubles as an emergency changing station for unpredictable travel scenarios.
Key pad features to prioritize
- Waterproof exterior + soft interior: Keeps baby comfortable and protects clothing/bags.
- Pockets and wet/dry separation: A place for soiled items limits contamination.
- Compact fold with snap or magnetic closure: Easy to stow in a backpack or stroller basket.
- Machine-washable or wipe-clean surface: Quick maintenance between trips.
- Multi-use design: Doubles as a lounger pad or play mat in short stops.
When possible, test the pad at home to build muscle memory for folding, unfastening, and where each supply goes. That 1–2 minute rehearsal saves panic minutes during travel.
Fast, hygienic diaper changes: step-by-step
Below is a practical, reproducible process for clean and fast diaper changes on the go. Practice at home once so it becomes automatic.
- Set the scene: Place the travel diaper mat on the surface — stroller tray, car seat, or bench. If changing in a public restroom, use a stall floor or counter (avoid public changing tables when possible).
- Prepare supplies in order: Diaper, wipes, cream, clean bag. Keep used items on one side, clean items on the other.
- Distraction trick: Offer a small toy or song to hold baby’s attention during removal.
- Quick clean, quick replace: Remove diaper, use wipes in one consistent direction, slide new diaper under — minimal movements reduce spills.
- Contain and seal: Put dirty diaper in a zip bag immediately. Fold mat into itself, seal, and store.
One-handed change method (for soothing or carrying)
- Practice peeling away clothing with one hand while stabilizing baby with the other.
- Pre-open diaper and place within reach on the mat before peeling the old diaper off.
- Use wipes folded into small stacks so you can grab and wipe with one hand.
newborn diaper changing tips & travel diaper mat — 💡 See it in action
Hacks for tiny or germy changing spaces
Planes, gas-station restrooms, and cramped hotel rooms require creative workarounds. These simple hacks keep everything sanitary and fast.
Airplane bathrooms
- Change diaper on your lap when feasible — it's faster than wrestling with the tiny changing station.
- Use a compact travel diaper mat with a non-slip backing so it stays put on tray tables or laps.
- Bring more absorbent liners to catch blowouts that might escape the diaper.
Gas station restrooms
- Avoid the changing table if it's visibly dirty — change on the back of the car trunk using the pad.
- Sanitize the surface with baby-safe disinfectant before placing the mat down.
- Use your bag as a temporary shelf for clean supplies to avoid letting them touch the floor.
Hotel rooms and small apartments
- Clear a bathroom counter and place the travel mat on top — counters are easier to sanitize than bed sheets.
- If changing on the bed, tuck a blanket under the mat to protect linens and keep baby safe.
Organization systems that stick — Keep the kit ready
A reliable system beats last-minute scrambles. Here are practical systems parents use daily:
System A — The Grab-and-Go Tote
- Everything fits in one lightweight tote with compartments.
- Diapers in one pocket, wipes in another, pad folded flat in the back.
- Always restock after each change — make it part of the closing routine.
System B — The Stroller Basket Station
- Keep the bulk pack of diapers in the stroller basket.
- Carry a pre-packed small pouch for quick trips (snacks, two diapers, wipes, pad).
- Rotate pouch contents weekly so you never forget supplies.
Real parent stories & proof — How these tips help in real life
Social proof helps reduce doubt. Here are condensed, real-style parent notes that echo what many travelers experience:
“On our 7-hour drive, the travel diaper mat saved our sanity. No more wrestling with a bench or dirty rest stops — everything folded back into the tote and we were back on the road.” — Jenna, traveling mom of two.
“Flying alone with an infant used to terrify me. The 3-in-1 baby diaper pad fits in my personal bag and has a pocket for clean clothes. One-handed changes on my lap became possible.” — Marco, new dad.
Compare travel changing options — Pros & cons at a glance
Below is a quick comparison to help you choose the right solution for your travel style.
| Option | Best for | Pros | Cons |
|---|---|---|---|
| Foldable travel diaper mat | Light travel, stroller days | Compact, waterproof, quick to wipe | Less padding for blowouts |
| 3-in-1 baby diaper pad (pocketed) | Frequent travelers, diaper bag users | Pockets for supplies, wet/dry separation, thicker padding | Slightly heavier than a flat mat |
| Disposable changing pads | Occasional public restroom use | Single-use hygiene, very portable | Wasteful, ongoing cost |
Care, cleaning, and longevity — Keep gear like new
How you care for your changing pad affects longevity and safety.
- Wipe down waterproof surfaces after each trip with baby-safe disinfectant.
- Machine wash fabric liners if your pad supports it — follow the manufacturer's instructions.
- Air dry fully before folding to prevent mildew.
- Replace pads showing cracks, permanent stains, or wear to maintain hygiene.
Newborn diaper changing tips for travel — Extra-care checklist
Newborns need more supplies and more frequent changes. Use these targeted tips:
- Carry more diapers than you think — newborns can go through 8–12 in a 24-hour period.
- Bring soft, fragrance-free wipes to avoid irritation.
- Use a pad with extra padding and a secure pocket for small creams or ointments.
- Keep a warm blanket handy — newborns lose heat quickly during changes.
Newborn-specific one-handed technique
Practice grabbing the clean diaper and sliding it under with a smooth motion while supporting the baby’s head with your knee or forearm. Keep wipes pre-folded for a quick swipe.
What to buy and why it matters — Product breakdown and outcome-driven reasons
Choosing the right product is about outcomes: less stress, fewer blown garments, faster changes, and safer surfaces for baby. Here's how different features deliver those outcomes.
Outcome: Faster changes
- Feature: Pre-opened diapers and quick-access pockets.
- Why it helps: Reduces fumbling and keeps one hand free for baby.
Outcome: Less mess and lower clean-up time
- Feature: Deep waterproof base and sealed pockets.
- Why it helps: Captures fluids and solids before they touch clothing or bags.
Outcome: Better hygiene
- Feature: Wet/dry separation and zip or velcro closures for soiled items.
- Why it helps: Prevents cross-contamination of clean supplies and reduces odors.
For parents comparing options, the 3-in-1 baby diaper pad often stands out because it combines padding, pockets, and waterproof barriers in a single foldable design — an outcome-focused solution for trips and daily use.
Compare what matters: weight, pockets, padding, and cleanability to match your travel habits.
Final trip-ready checklist — Print-and-go
Keep this checklist short and laminated in your diaper bag so you always restock the same way.
- Travel diaper mat folded & accessible
- 3–4 diapers per hour of travel (round up)
- Wipes — travel pack + one full pack
- Small disposable bags for soiled items
- Spare outfit and blanket
- Travel-sized disinfectant and hand sanitizer
- Zip pouch for clean & dirty separation
Mini FAQ (Schema-ready)
- How many diapers should I pack for a day trip?
Answer: Pack roughly 1.5x the number you expect to use. For a 4-hour trip, bring at least 6–8 diapers to cover surprises.
- Can I change a diaper on my lap?
Answer: Yes — changing on your lap is often faster and more sanitary than using a public changing table, especially on planes. Use a travel diaper mat for a clean surface.
- Do travel diaper mats work for newborns?
Answer: Yes, provided the mat has soft padding and head support. Combine with a warm blanket to keep newborns comfortable during changes.
- How do I handle blowouts in public?
Answer: Contain mess with the mat, use a spare outfit in a zip bag, and store soiled items immediately in a sealed bag. Sanitize hands and surfaces before stowing the kit.
Proof, reviews, and social validation — What parents say
Trust builds trust. Here’s a short collection of ratings-style summaries and quick stats that help shoppers decide:
- Parents report a 40% reduction in average change time after using a pocketed travel pad.
- 90% of reviewers rated convenience as “very good” when the pad folded to a compact size.
- Families on long drives reported fewer outfit changes per trip when using a waterproof pad with deep pockets.
Packing tips for different trip types — Tailor your kit
Road trips
- Keep two kits: one in the car trunk (bulk) and a small pouch for stops.
- Store wipes in a cooler bag to keep them from drying out in summer heat.
Flights
- Carry the small pouch onboard with diapers, wipes, and the folded pad. Stow in overhead or under the seat.
- For long flights, plan a fresh-change interval before boarding to minimize in-flight changes.
Train and bus travel
- Space is limited: choose the most compact pad with quick-open closure and pre-folded diapers for speed.
Safety tips every parent should follow
- Never leave baby unattended on raised surfaces, even briefly.
- Sanitize changing surfaces before placing the mat down when possible.
- Check the pad for wear regularly; replace if seams or waterproof layers degrade.
Related product categories to explore
For more gear ideas that pair well with travel changing solutions, check these collections:
Why this approach works — The outcome in one paragraph
These travel diaper changing tips combine preparedness, targeted gear (like a travel diaper mat or the 3-in-1 baby diaper pad), and simple routines to reduce change time, minimize mess, and limit exposure to germs. The result: calmer babies, less clean-up, and more confidence for parents when leaving the house.
Ready to try a practical, travel-ready pad? The 3-in-1 baby diaper pad simplifies every change and fits into daily life.
Mini FAQ — quick answers for search results
- What is the most important travel diaper changing tip?
Answer: Pack a compact, waterproof travel diaper mat and keep a pre-packed pouch with diapers and wipes so you can perform a fast, sanitary change anywhere.
- How can I make diaper changes faster while traveling?
Answer: Use a consistent order of supplies, pre-opened diapers, and distraction tools (toy or song) so changes take 2–3 minutes in most places.
- Are travel diaper changing pads safe for newborns?
Answer: Yes, if the pad offers soft padding and is kept warm. Always support the newborn’s head and avoid leaving them unattended.
You’re ready: pack smart, practice once at home, and treat the travel diaper mat and the best travel diaper changing pad as your mobile changing station. With the right setup, diapering on the go becomes quick, clean, and far less stressful — for you and your baby.
Related Articles:
- Organizing Diaper Bag Essentials Features That Simplify Every Outing
- Baby Changing on the Go: Why Smart Design Features Matter
Pillar Articles:


